Hashgraph DID SDK: Key Management Modes
This guide outlines the different key management strategies supported by the DID-SDK, allowing you to choose the approach that best suits your security needs and application architecture. Proper key management is crucial for the security and integrity of your Decentralized Identifiers (DIDs). Choose the strategy that aligns with your risk tolerance and operational requirements.
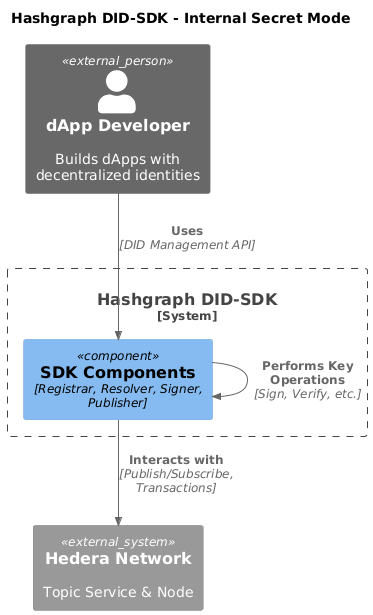
Internal Secret Mode
In this mode, the DID-SDK generates and stores the private key within the application itself. This approach is suitable for:
-
Development and testing: When experimenting with DIDs and the SDK.
-
Low-risk environments: Where the security of the DID is not critical.
-
Prototyping: For proof-of-concept implementations.
| Avoid using this mode in production environments or when dealing with sensitive data, as it increases the risk of private key exposure. |
Creating a DID
const { did, didDocument } = await createDID({
  privateKey: "0x...", // Replace with your private key in DER format
  client,
});
Alternatively, generate a new private key:
const { did, didDocument } = await createDID({
  privateKey: new PrivateKey(),
  client,
});External Secret Mode
This mode offers enhanced security by storing private keys externally, such as in:
-
Hardware Security Modules (HSMs): Provide tamper-resistant protection for keys.
-
Cloud Key Management Systems (KMS): Offer secure, centralized key management with granular access control.
This approach is recommended for production systems and applications handling sensitive data.
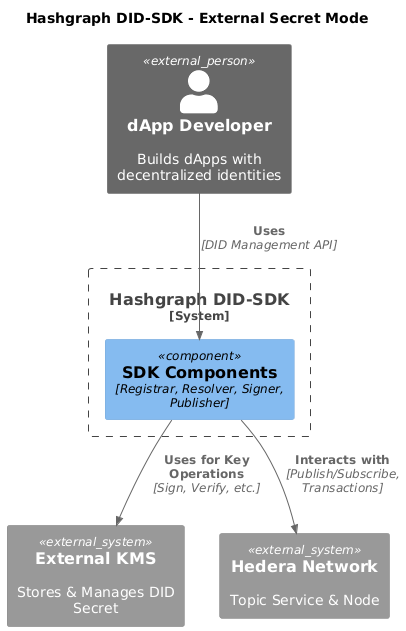
The Signer object acts as an interface to your external key management system. For example, to use a HashiCorp Vault for key storage, you would configure the Vault Signer using a VaultSignerFactory:
const signerFactory = await VaultSignerFactory.loginWithToken({
  token: 'your-vault-token',
  url: 'your-vault-url',
});
Creating a DID
const { did, didDocument } = await createDID({
  signer: await signerFactory.forKey('your-key-name'), // 'your-key-name' identifies the key in your Vault
  client,
});Client Managed Secret Mode
This mode delegates private key management to the client application, often within a secure wallet environment. This is suitable for scenarios where:
-
Users control their own keys: Providing self-sovereignty over DIDs.
-
Keys are stored in secure enclaves: Like mobile wallets or browser extensions.
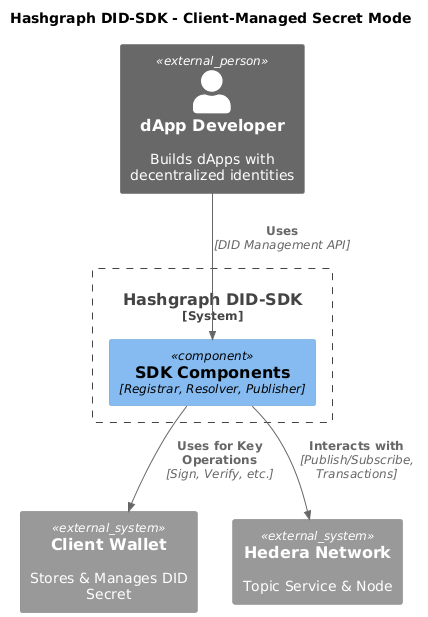
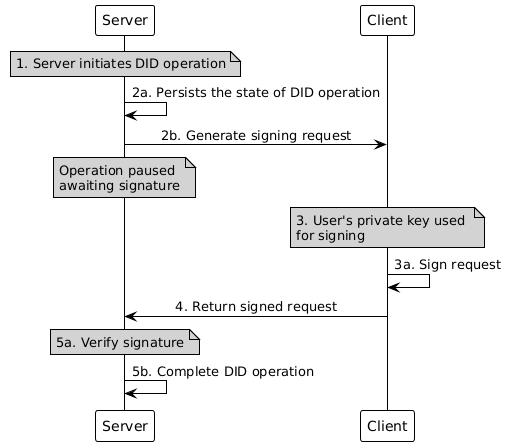
This mode uses a specific lifecycle flow to facilitate secure signing by the client.
Here’s how it works:
-
Server initiates the operation: The server starts the DID creation, update, or deactivation process.
-
Server pauses for client signature: The server generates a signing request and a state. The state object contains the operation details, while the signing request includes the payload to be signed. The server then sends the signing request to the client and persists the state object for later use.
-
Client signs the request: The client application (e.g., a wallet) uses the user’s private key to sign the request.
-
Client returns the signature: The signed request is sent back to the server.
-
Server completes the operation: The server verifies the signature and completes the DID operation using persisted state.
Creating a DID
// Server initiates lifecycle flow and pauses
const { state, signingRequest } = await generateCreateDIDRequest(
  { multibasePublicKey: 'zK24v8mQF...' }, // Public key of client's wallet, used for DID root key
  { client }
);

// Server sends signing request to client
// Client signs request payload with wallet and returns signature
const payload = signingRequest.serializedPayload;
const clientSignature = await wallet.sign(payload);

// Server resumes lifecycle and creates final DID on the network
const { did, didDocument } = await submitCreateDIDRequest(
  state,
  clientSignature,
  { client }
);
Updating a DID
// Server initiates lifecycle flow and pauses
const { states, signingRequests } = await generateUpdateDIDRequest(
  { did, updates: [...] },
  { client }
);

// Server sends signing requests to client
// Client signs each request payload with wallet and returns signatures
// Each request corresponds to a specific update operation, and the client signs them sequentially
const signatures = Object.keys(signingRequests).reduce(async (acc, request) => {
  const signingRequest = signingRequests[request];
  const signature = await wallet.sign(signingRequest.serializedPayload);

  return {
    ..acc,
    [request]: signature,
  };
}, {});

// Server resumes lifecycle and updates DID on the network
const { did, didDocument } = await submitUpdateDIDRequest(
  states,
  signatures,
  { client }
);
Deactivating a DID
// Server initiates lifecycle flow and pauses
const { state, signingRequest } = await generateDeactivateDIDRequest(
  { did },
  { client }
);

// Server sends signing request to client
// Client signs request payload with wallet and returns signature
const payload = signingRequest.serializedPayload;
const clientSignature = await wallet.sign(payload);

// Server resumes lifecycle and creates final DID on the network
const { did, didDocument } = await submitDeactivateDIDRequest(
  state,
  clientSignature,
  { client }
);
Persisting a state object
The generated state object contains the operation details and is used to resume the DID operation. It should be persisted securely on the server side, ensuring that it is not tampered with or exposed to unauthorized parties. Once the client returns the signed request, the server can use the state object to complete the operation.
States is a OperationState object, and have the following structure:
type StateStatus = 'success' | 'error' | 'pause';

interface OperationState {
  message: string;
  status: StateStatus;
  index: number;
  label: string;
}
All of the properties are primitives, so they can be easily persisted in a database or file system.
Next Steps
-
Explore
resolveDID: Dive deeper into the resolveDID function to understand its parameters, error handling, and advanced usage. -
Manage DIDs: Learn how to use createDID, updateDID, and deactivateDID to effectively manage DIDs on Hedera.
-
Implement the
Signer: Practice generating key pairs, signing messages, and verifying signatures using the Signer class. -
Utilize the
Publisher: Integrate the Publisher class into your application for seamless transaction submission. -
Handling Exceptions: Explore best practices for handling exceptions and errors when working with the Hashgraph DID SDK: Handling Exceptions Guide.